

How To Format And Install Windows
A clean installation of Windows 10 is the process of erasing the hardware and setting up a new fresh re-create of the platform when a figurer has a problem. For example, you lot can resolve performance, memory, startup, shut down, and apps issues using this method. Besides, it'due south perhaps the best arroyo to remove viruses and other types of malware, and information technology can help to better battery life.
In addition, it's an excellent solution to remove preloaded bloatware (unnecessary preloaded software) from Windows 10. You can use this method to decommission a estimator without giving away your data. Or you can ready a new installation after replacing the hard drive.
Furthermore, if you had the aforementioned setup for some time, a make clean installation is the recommended option to upgrade to the latest version of Windows 10 or upgrade from an older version (such every bit Windows 7 and Windows 8.1), minimizing the risks of problems during and after the process.
In this Windows ten guide, we volition walk y'all through the consummate process to perform a clean installation.
- How to fix reckoner for clean install of Windows 10
- How to create USB bootable media for clean install of Windows 10
- How to perform make clean install of Windows 10
- How to complete setup afterwards clean install of Windows 10
How to prepare calculator for clean install of Windows x
Every bit you prepare to proceed with a clean installation of Windows x, it's recommended to complete some essential tasks to minimize issues and potential data loss.
If you already take a fill-in of the computer and files. You accept an activation product key. The device tin can start from a USB wink drive, and non-essential peripherals are asunder, so you tin skip this part and jump to the bootable media cosmos and a make clean install process.
Create backup
The install process of Windows x deletes everything on the drive, which means that backing up the entire device (or at to the lowest degree your files) is a crucial step unless you lot don't have anything important you want to go along.
Support entire system
You lot should create a temporary backup to revert the settings or recover files if something goes wrong during the installation.
You tin choose many unlike solutions, simply the easiest mode to create a full backup is to use the legacy System Image Backup tool available on Windows x. It'due south a deprecated feature, but information technology continues to piece of work. The tool is likewise bachelor for Windows 8.i and Windows seven.
Back up files to OneDrive
If you lot need to dorsum up your documents, pictures, and other important files, you can upload the data to OneDrive or another cloud storage service.
In case yous use OneDrive, you tin can also apply the backup settings folio to sync your profile folders, including Documents, Pictures, and Desktop, to the cloud automatically.
To configure OneDrive backup on Windows ten, apply these steps:
- Open up Settings.
- Click on Update & Security.
- Click on Fill-in.
-
Under the "Support files to OneDrive" section, click the Back up files option.
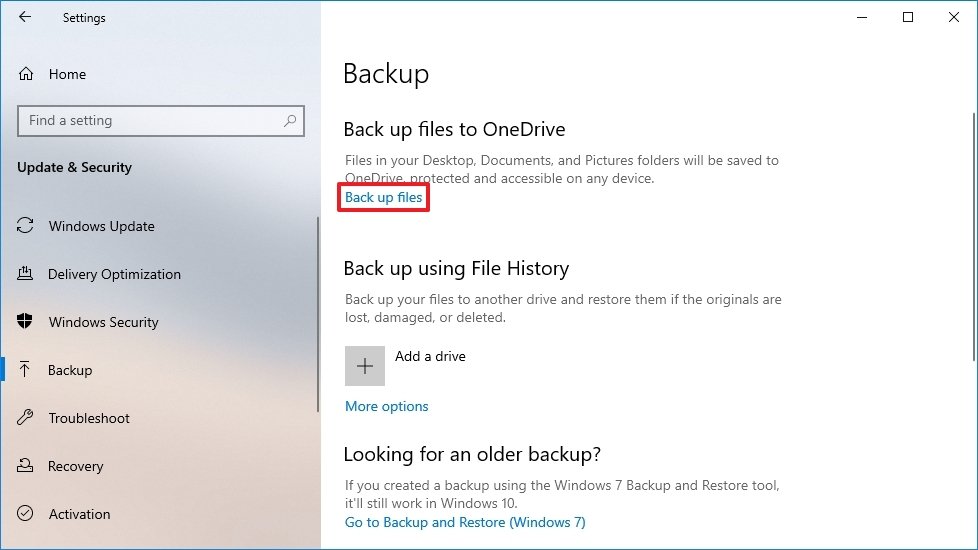 Source: Windows Cardinal
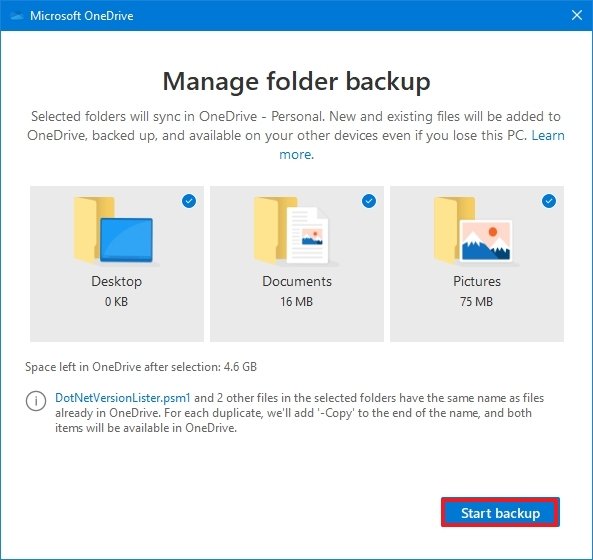
 - (Optional) Click to articulate the folder you don't desire to back up in the deject.
-
Click the Start fill-in button.
 Source: Windows Central


Once you complete the steps, OneDrive will support the files on the Desktop, Documents, and Pictures user folders in the deject.
Dorsum upward files to external storage
If y'all have a lot of data, syncing the files to the cloud can be expensive and accept a long fourth dimension, and the available space may non even be enough. If this is the example, mayhap the all-time option would be to copy the files to an external USB hard drive.
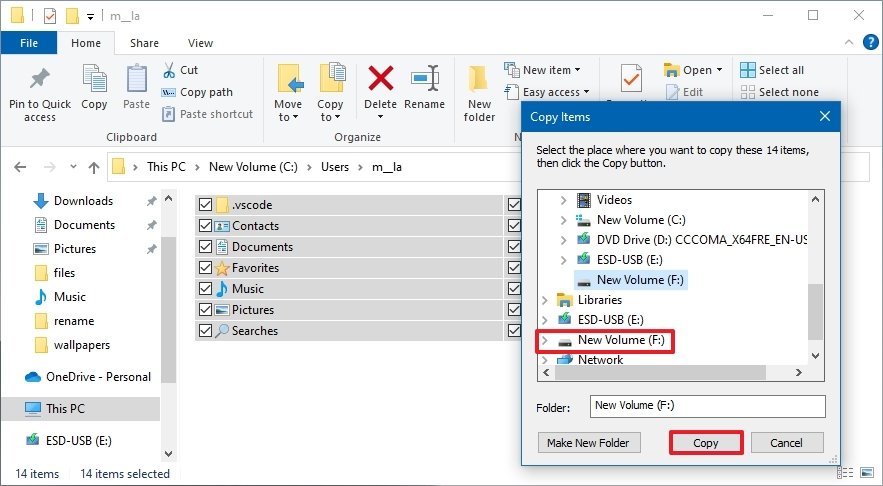
To create a file backup manually, connect an external drive with enough storage space to your Windows 10 computer, and utilise these steps:
- Open File Explorer.
-
Type the post-obit path in the address bar and press Enter:
%HOMEPATH%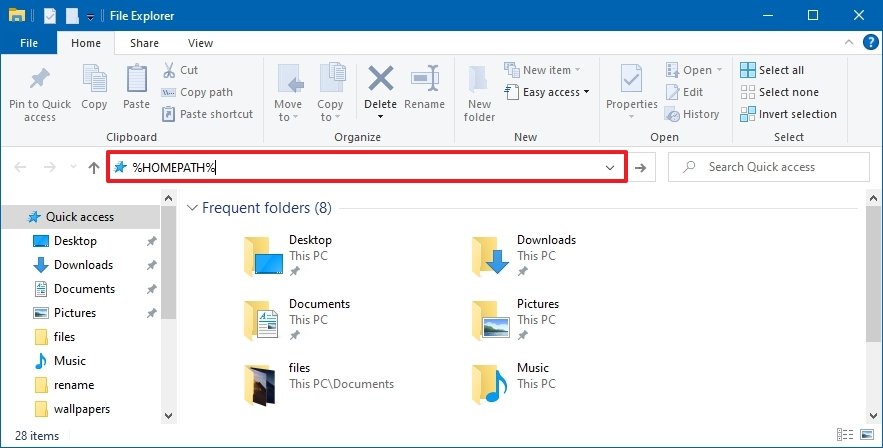 Source: Windows Central
 -
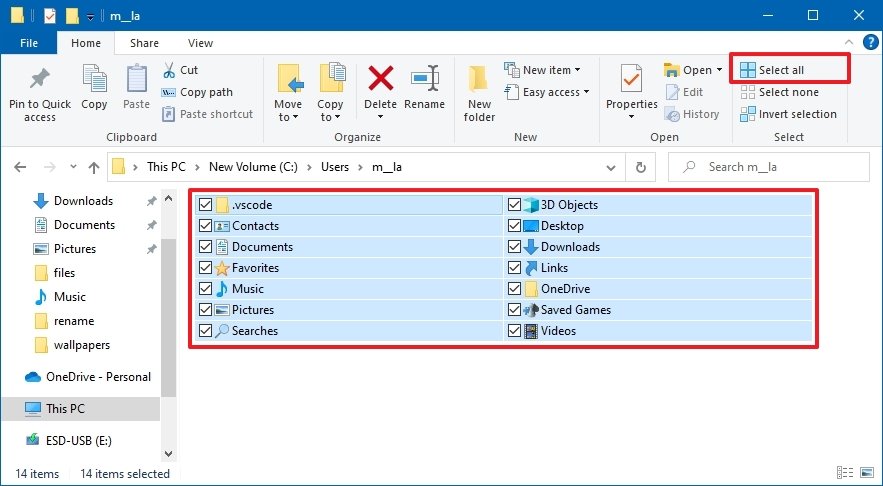
Click the Select all push button from the "Home" tab.
 Source: Windows Central
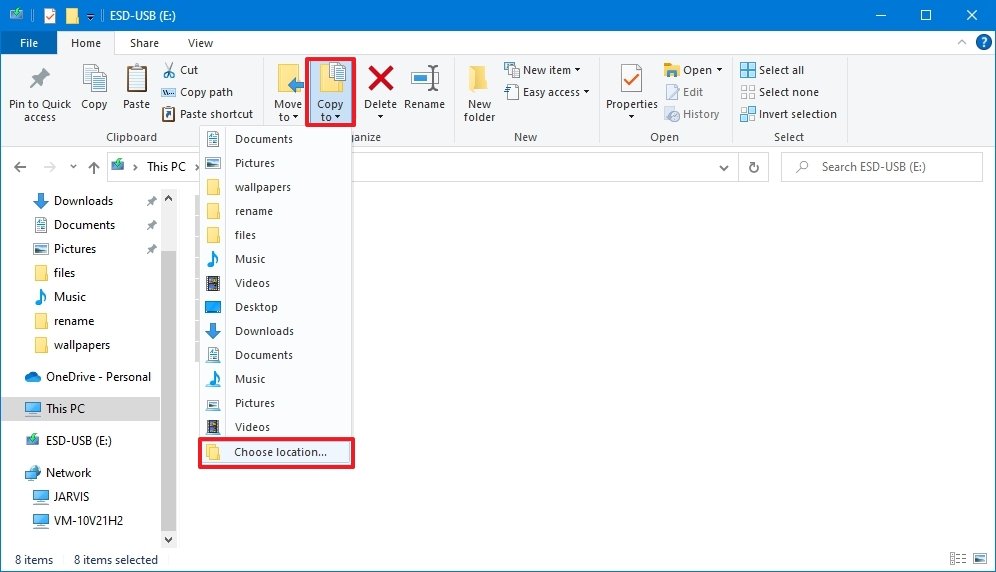
 - Click the Re-create to push button from the "Habitation" tab.
- Select the Cull location option.
-
Select the destination location.
 Source: Windows Key
 - Click the Copy push.


After you complete the steps, echo the instructions to back upwards the remaining accounts (as necessary). In addition to copying your files, it's also a good idea to create a list of the installed programs with their respective production keys (if applicable) to know the apps to reinstall after the installation.
If you usually don't sync passwords and bookmarks with an online service, at present's a expert time to consign your browser credentials and links as yous'll need them later to admission your online services.
In example you don't have an external hard drive or one without enough space, we recommend the Western Digital Elements Desktop Hard Drive because of its portability, capacity, and cost.
Check Windows 10 activation
Although afterward activating Windows x, you no longer have to provide a production central for reinstallation in the same computer. In one case the new installation completes, the system will automatically reactivate when it connects to the net.
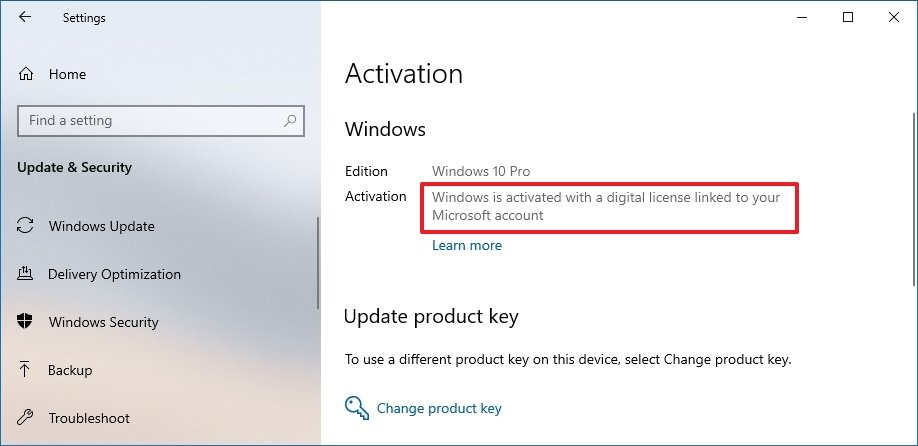
To confirm whether Windows 10 is properly activated, use these steps:
- Open up Settings.
- Click on Update & Security.
- Click on Activation.
-
Under the "Windows" section, ostend the activation. If the computer has been properly activated, you lot'll see one of these messages:
- Windows is activated with a digital license: The installation has been activated, simply information technology isn't linked to your Microsoft account.
- Windows is activated with a digital license linked to your Microsoft account: The installation has been activated, and the license is linked to your Microsoft account.
 Source: Windows Central

Afterward you complete the steps, Windows 10 should automatically reactivate after the clean installation if your current setup is activated.
Obtain Windows 10 18-carat central
If y'all accept to set up an installation on a computer that never had an activated version of Windows 10, or you plan to upgrade from Windows 8.1 or Windows 7, you will have to purchase a valid license from the Microsoft Store, Amazon, or some other retailer.
Download essential drivers
Windows 10 can detect and install virtually drivers automatically. Notwithstanding, information technology'southward usually recommended to download at least the essential drivers earlier the process (such as for the network adapter and graphics card), every bit a precaution, in case the setup fails to add together these drivers correctly, particularly on custom computer builds.
You can use our guide to install device drivers on Windows x.
Hither's a listing of the most pop manufacturers to download the latest device drivers:
- Dell
- HP
- Lenovo
- ASUS
- Acer
- Samsung
- MSI
Confirm Windows 10 requirements
If the device already has Windows ten, the following major update about likely will meet the minimum hardware requirements. Still, if you lot're virtually to upgrade a computer running Windows 7 or Windows 8.1, you lot want to check that the device meets the minimum requirements.
Hither are the minimum requirements to install the Windows 10 Nov 2022 Update (and higher):
- Processor: 1GHz or System on a Chip (SoC).
- Retentiveness: 1GB for 32-bit or 2GB for 64-bit.
- Storage: 32GB for 64-flake or 32-bit.
- Graphics bill of fare: DirectX 9 or later with WDDM ane.0 driver.
- Display: 800x600.
You can utilise these instructions to check the device technical specifications to confirm yous tin do a make clean install of Windows 10.
Change boot social club on firmware
It's also important to make sure that the estimator can kicking from a USB flash drive. If this is not the case, you'll need to change the Basic Input/Output System (BIOS) or Unified Extensible Firmware Interface (UEFI) on the motherboard.
Change boot order using UEFI
On computers already running Windows 10 or 8.ane, you can access the settings to change the boot order within the desktop interface.
UEFI settings on Windows 10
To modify the UEFI settings on Windows x, utilise these steps:
- Open Settings.
- Click on Update & Security.
- Click on Recovery.
-
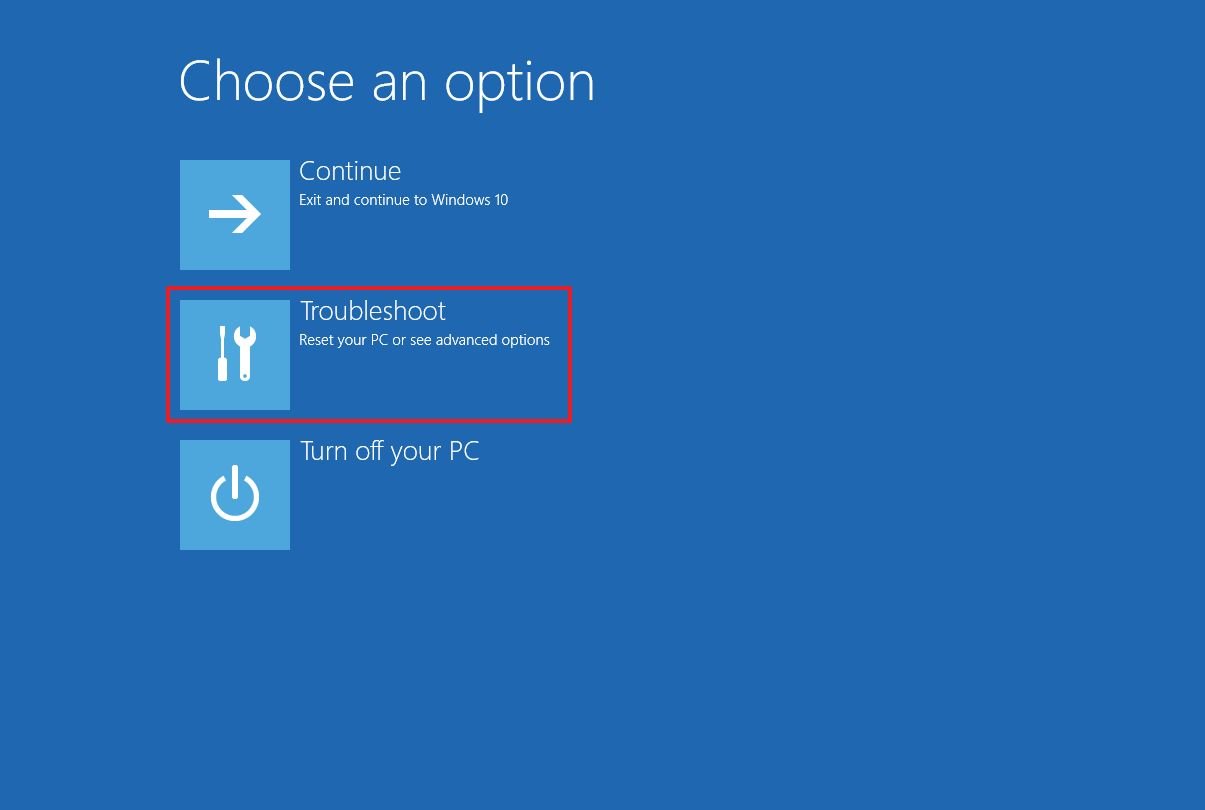
Nether the "Avant-garde startup" section, click the Restart now button.
 Source: Windows Central
 -
Click the Troubleshoot button.
 Source: Windows Central
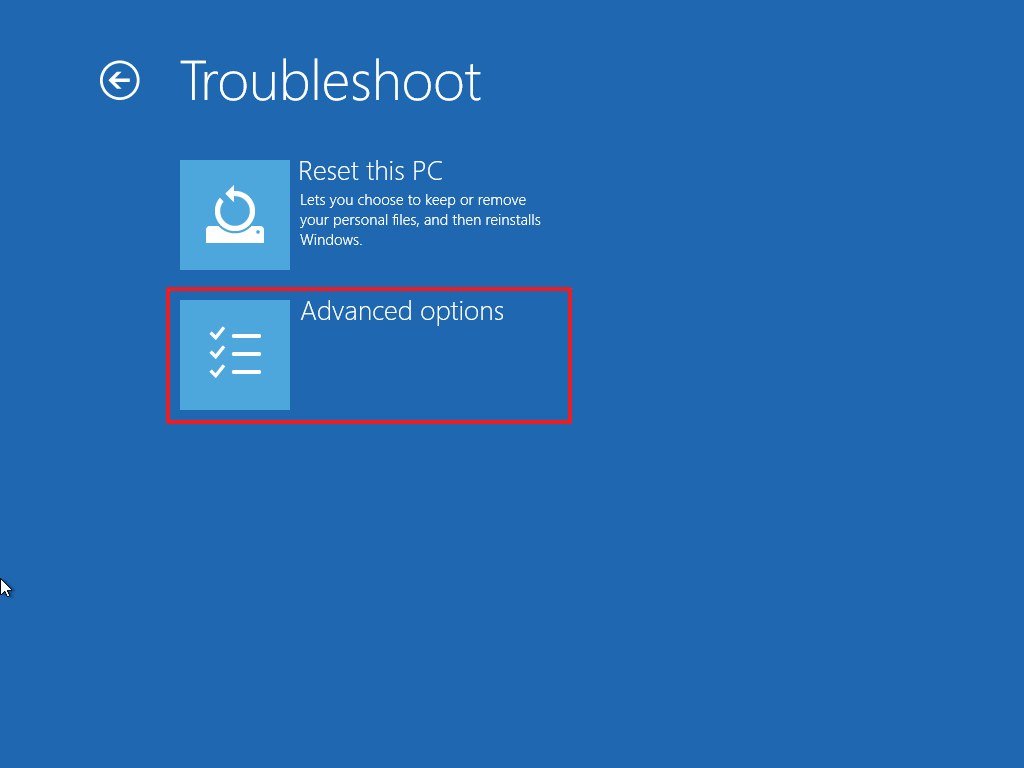
 -
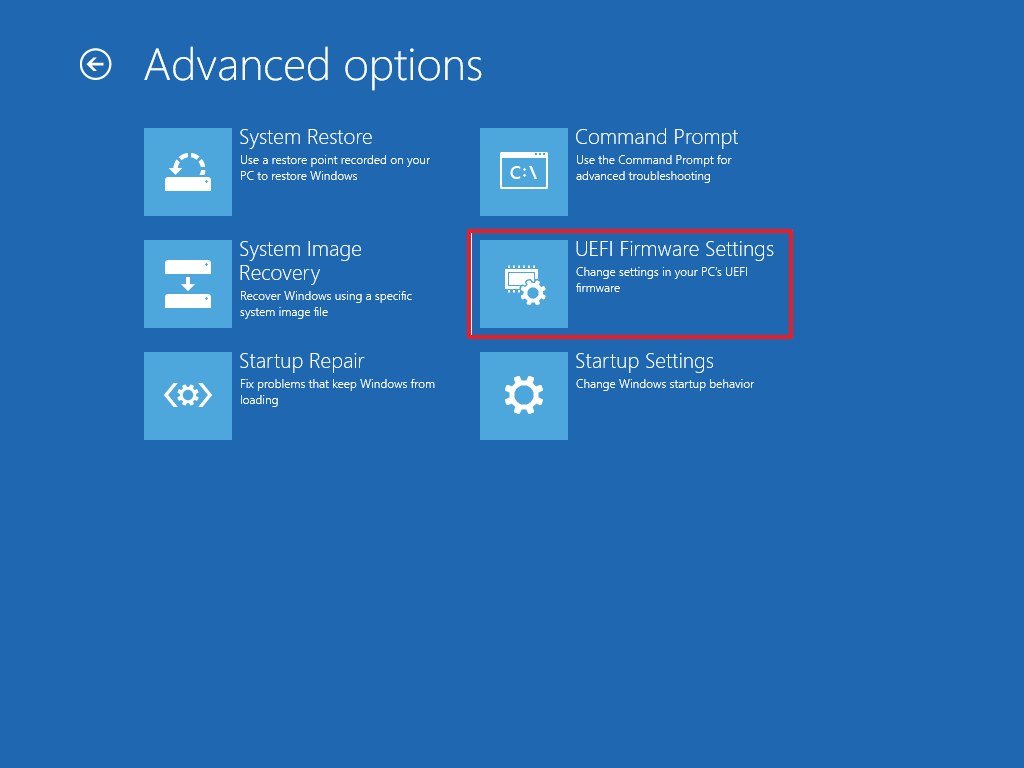
Click on Advanced options.
 Source: Windows Central
 -
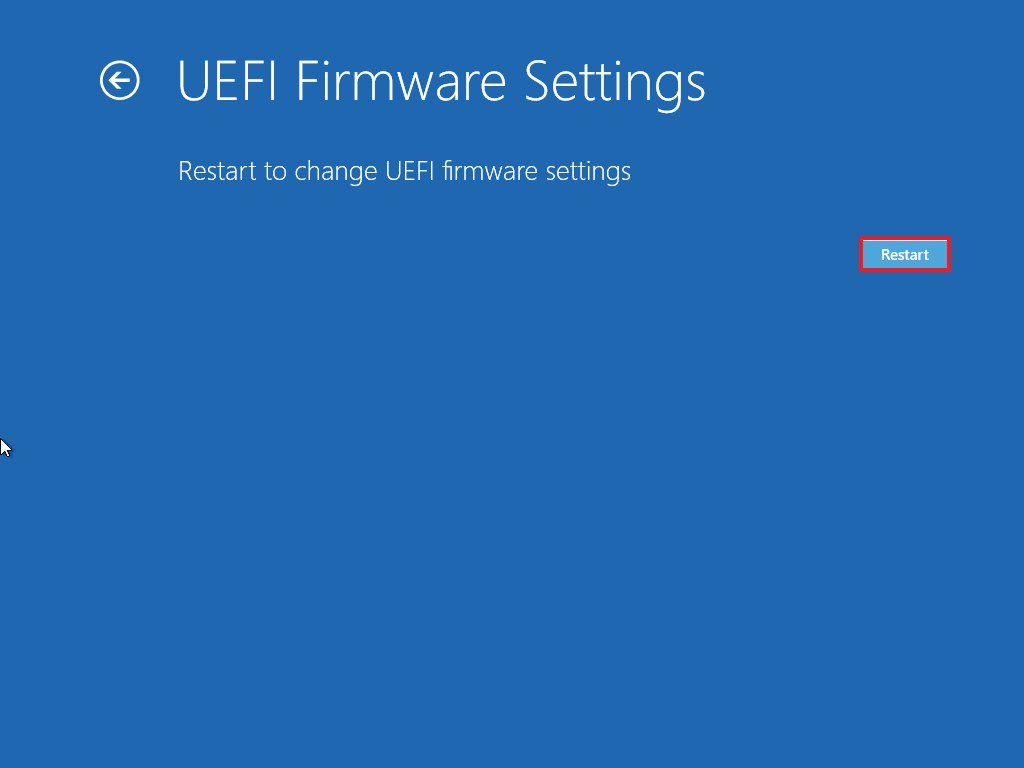
Click the UEFI Firmware Settings selection.
 Source: Windows Central
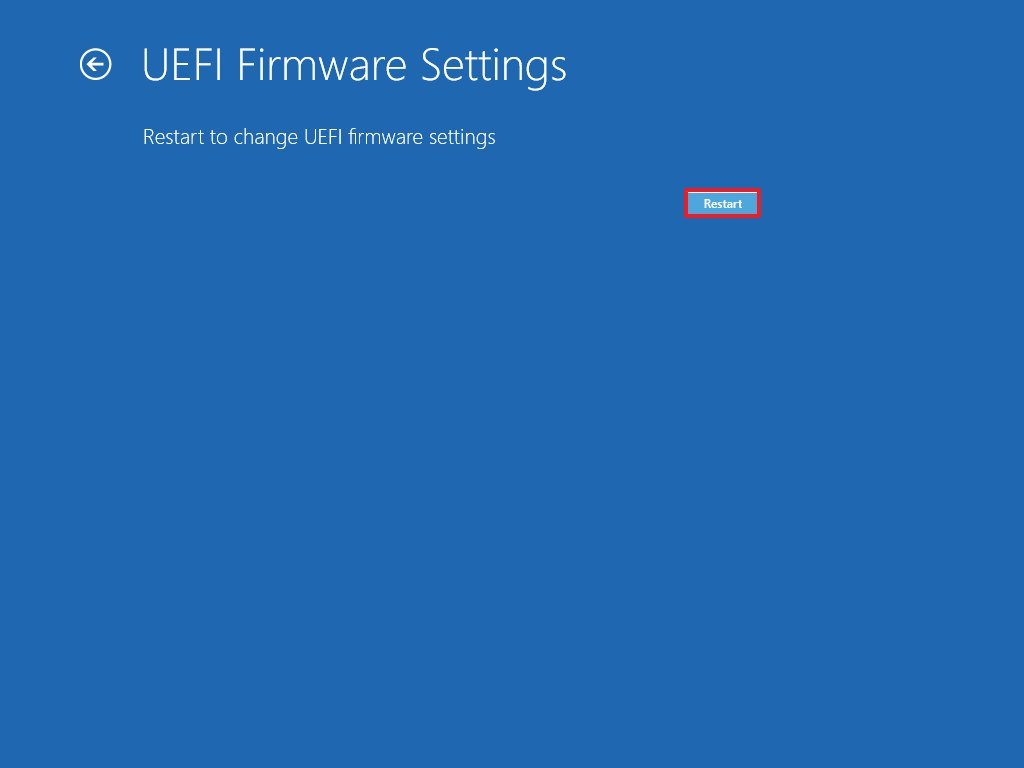
 -
Click the Restart button.
 Source: Windows Key
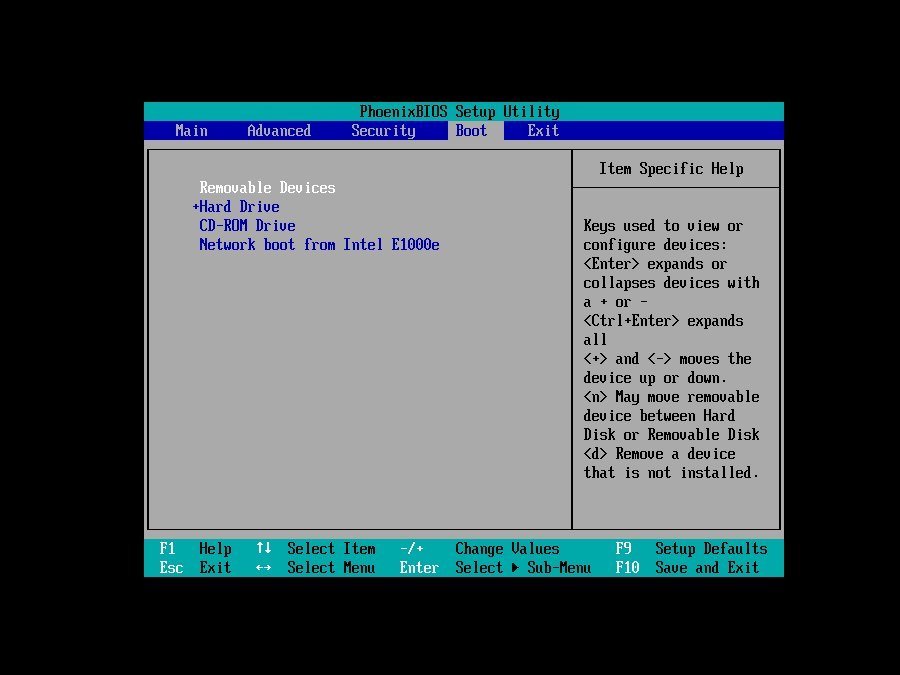
 - Inside the motherboard firmware settings, open the Kick page.
-
Gear up the kicking order to start from the USB flash bulldoze with the Windows ten installation files.
 Source: Windows Primal
 - Salvage the changes.


Subsequently you complete the steps, the computer should now be able to start from a USB bootable media.
UEFI settings on Windows eight.1
To change the UEFI settings on Windows 8.i, use these steps:
- Open up Settings.
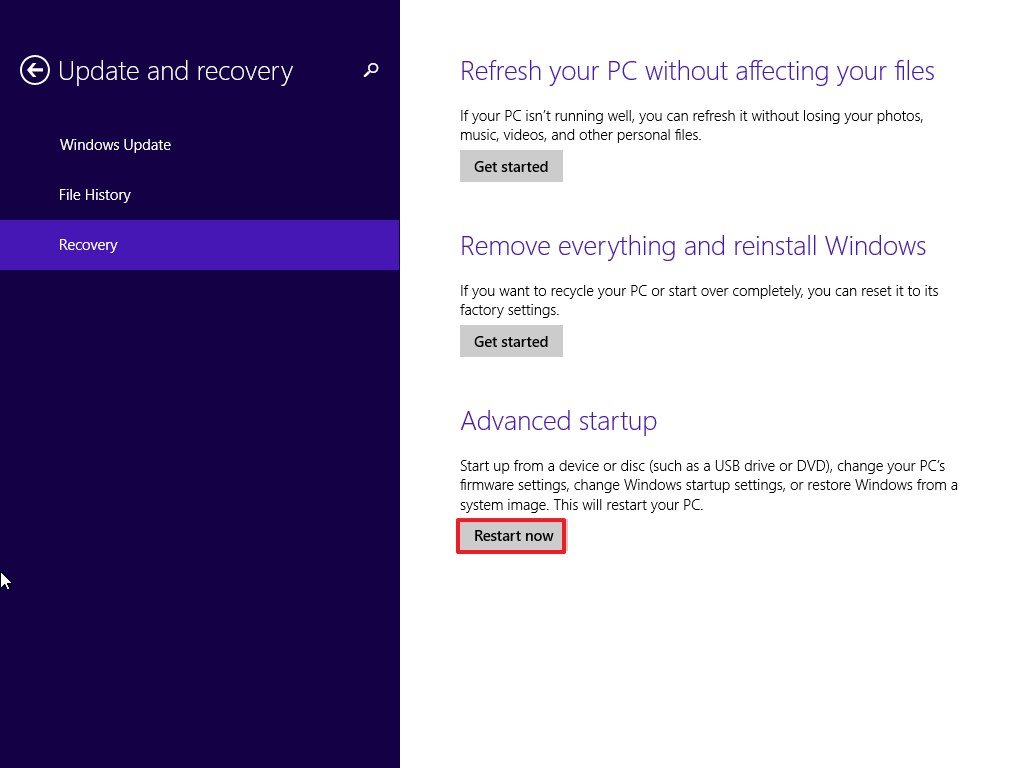
- Click on Update and recovery.
- Click on Recovery.
-
Under the "Avant-garde Startup" section, click the Restart at present push button.
 Source: Windows Cardinal
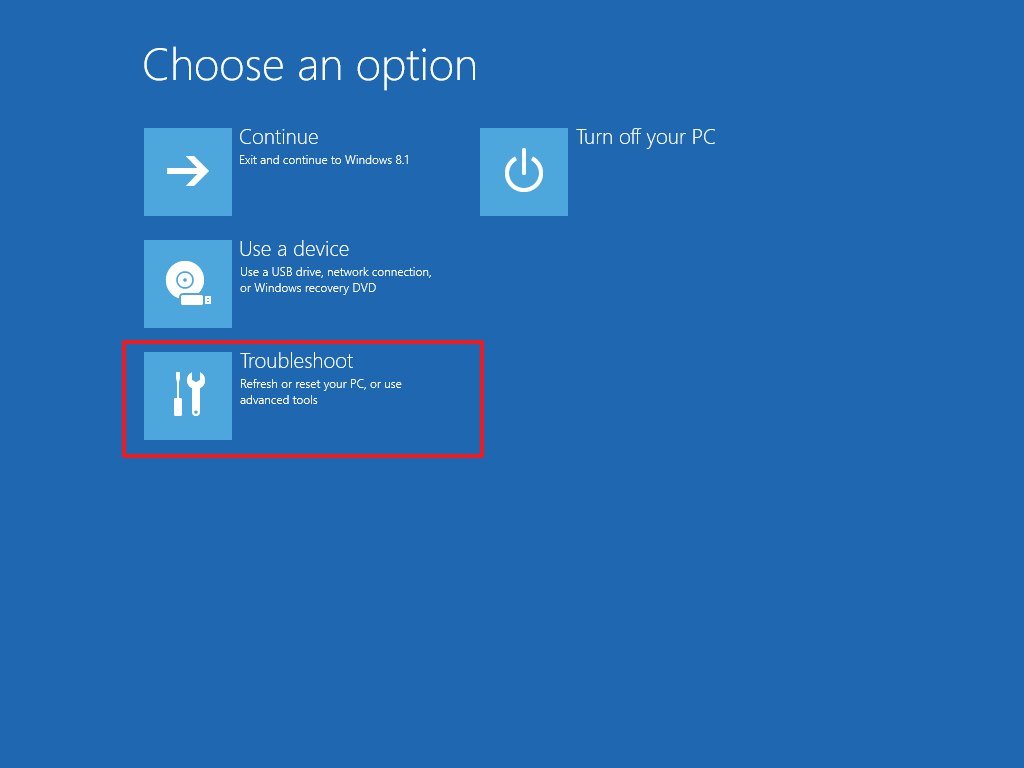
 -
Click the Troubleshoot option.
 Source: Windows Key
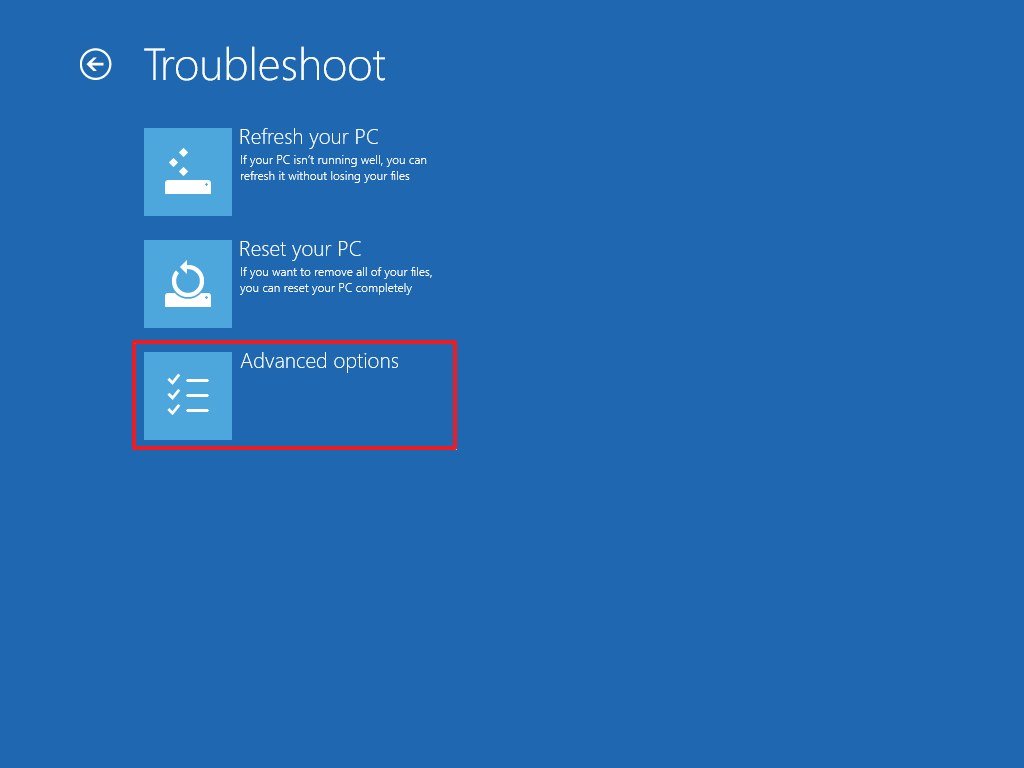
 -
Click on Advanced options.
 Source: Windows Central
 -
Click the UEFI Firmware Settings option.
 Source: Windows Cardinal
 -
Click the Restart push.
 Source: Windows Fundamental
 - Within the motherboard firmware settings, open up the Boot page.
-
Set the kicking order to start from the USB media with the Windows x installation files.
Source: Windows Central - Save the changes.


Once you consummate the steps, the device will start from a USB flash drive to proceed with the installation process.
UEFI settings on Windows seven
To change the UEFI settings on Windows 7, utilize these steps:
- Start the PC.
-
As soon as it starts, printing the F1, F2, F3, F10, F12, Esc, or Delete primal to access the firmware.
Quick tip: You may need to check your manufacturer back up website for more specific steps to access the firmware settings.
- Inside the motherboard firmware settings, open the Boot folio.
- Prepare the boot social club to offset with the Windows x installation files from the USB media.
Later y'all consummate the steps, y'all should be able to start the device using a bootable media.
Configure boot social club using BIOS
If y'all have a legacy BIOS firmware, you lot tin change the boot society with these steps:
- First the PC.
- As soon as the computer starts booting up, press one of the role keys (F1, F2, F3, F10, or F12), Esc, or Delete key.
- Within the motherboard firmware settings, open the Kick page.
-
Set the boot order to outset with the Windows 10 installation files from the USB media.
 Source: Windows Central
 - Salvage the changes.

In one case you complete the steps, the reckoner can now kickoff from the USB flash drive to upgrade to Windows ten.
Disconnect non-essential peripherals
Typically, peripherals are among the most common reason for issues during a Windows 10 installation. If you have not-essential peripherals connected to the figurer (such as removable storage and other USB and Bluetooth devices, printers, scanners, cameras, and others), it's recommended to disconnect them.
Y'all merely need a monitor, keyboard, mouse, and net connection. Afterwards the setup, yous can reconnect the peripherals (one at a time) to ensure they don't cause any bug.
How to create USB for clean install of Windows 10
You will need a USB bootable media to perform a make clean installation of Windows x. You lot tin can easily create one using many tools, including the Microsoft Media Creation Tool and Rufus.
Create Windows 10 USB with Media Creation Tool
To create an installation media using the Media Creation Tool, connect a USB flash drive of at least 8GB of space, and use these steps:
- Open the Windows 10 download folio.
- Under the "Create Windows 10 installation media" section, click the Download tool at present button to salve the file on the reckoner.
- Double-click the MediaCreationToolxxxx.exe file to launch the tool.
- Click the Accept button to agree to the Microsoft terms.
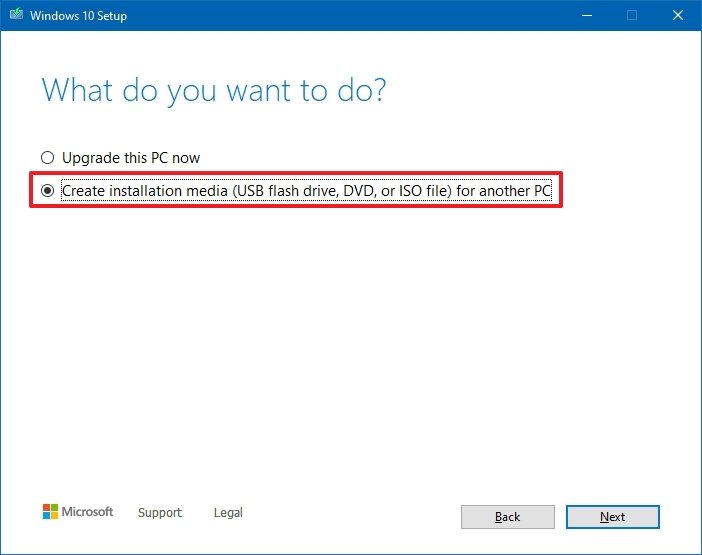
-
Select the Create installation media (USB wink drive, DVD, or ISO file) for another PC selection.
 Source: Windows Central
 - Click the Adjacent button.
- (Optional) Clear the Apply the recommended options for this PC option.
-
Select the correct language, architecture, and edition of Windows 10.
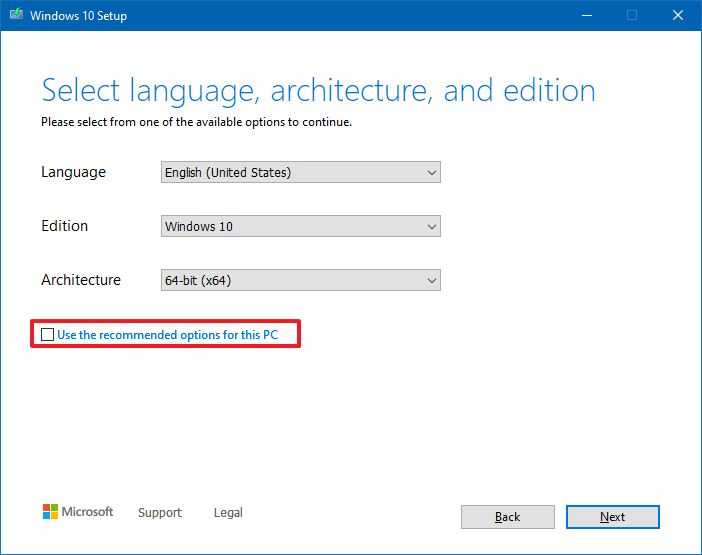 Source: Windows Central
 -
Click the Side by side push button.
 Source: Windows Central
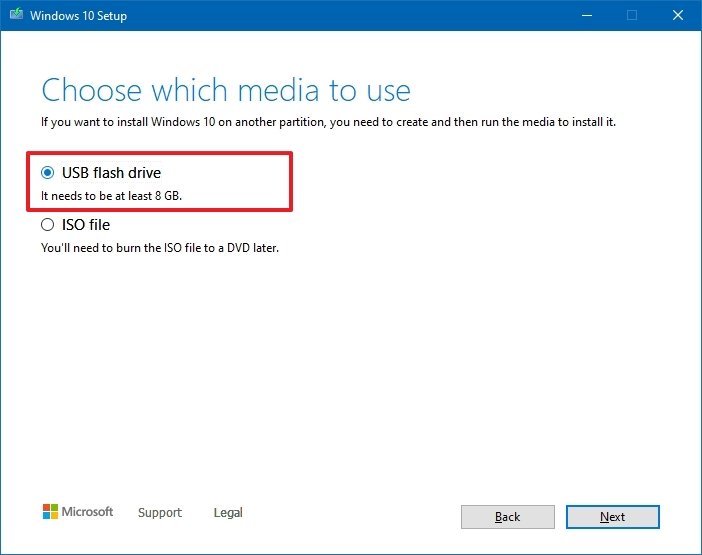
 -
Click the Side by side push button.
 Source: Windows Primal
 -
Select the USB flash drive (or click the "Refresh bulldoze listing" option to make information technology available).
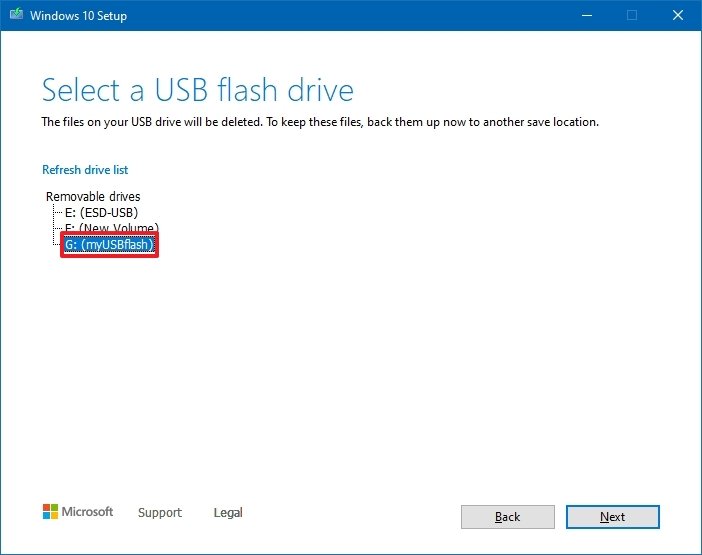 Source: Windows Cardinal
 - Click the Adjacent button.
- Click the Finish push button.


Once yous complete the steps, the tool will download the files and create an installer with the latest installation files, which you can so utilise to outset the device and configure a fresh copy of Windows 10.
Create Windows 10 USB with Rufus
Alternatively, the Rufus tool can help you create an installation media for computers with UEFI or BIOS firmware.
Rufus is a gratis tool with many options to assistance you create a bootable media of Windows 10 faster. Yet, it's important to recall that it'due south a third-party pick, which Microsoft does non back up. As a upshot, employ it at your own risk.
To create a Windows x USB installer with Rufus, connect a USB flash drive of at to the lowest degree 8GB of infinite, and then utilise these steps:
- Open the Rufus download page.
-
Nether the "Download" section, click the link to save the latest release on the computer.
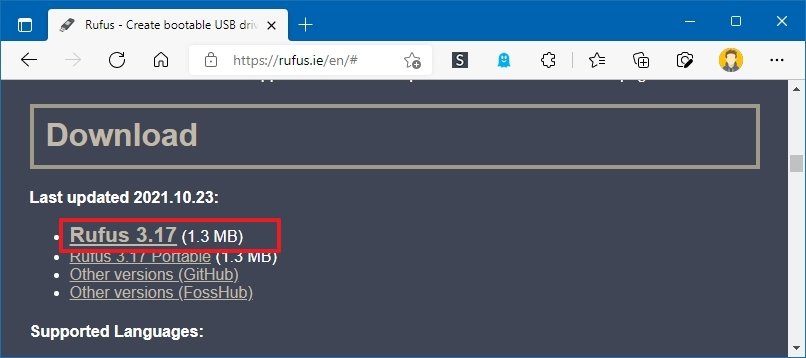 Source: Windows Central
 - Double-click the Rufus-x.20.exe file to launch the tool.
-
Click the Settings button (third push from the left) at the bottom of the page.
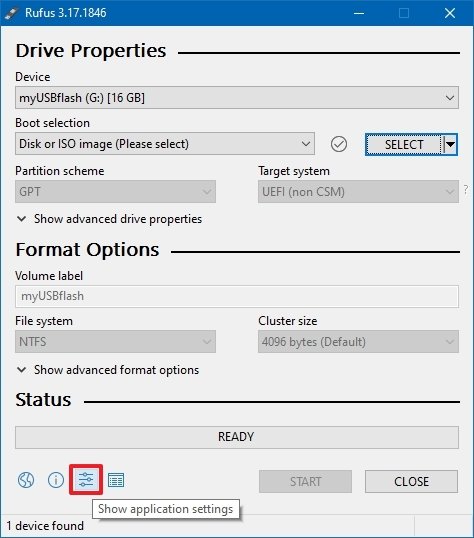 Source: Windows Central
 -
Under the "Settings" section, apply the Check for updates drib-downwards menu and select the Daily option.
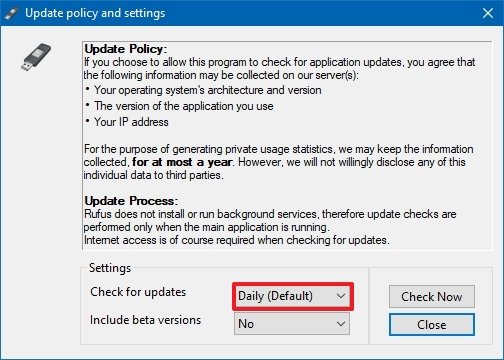 Source: Windows Central
 Quick tip: These steps are necessary to enable the pick to use the tool to download the ISO file of Windows 10.
- Click the Close push button.
- Close the Rufus tool.
- Relaunch the Rufus tool.
- Under the "Device" section, employ the driblet-down menu to select the USB flash bulldoze.
-
Nether the "Boot selection" section, click the downward pointer button on the right and select the Download choice.
 Source: Windows Fundamental
 Quick tip: If you already have an ISO file, click the Select button, choose the Windows 10 ISO file, and continue with step 24.
- Click the Download button.
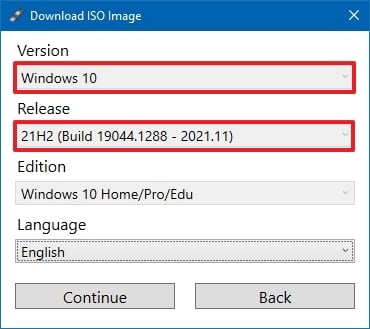
- Use the "Version" drop-down carte and select the Windows 10 pick.
- Click the Continue button.
-
Select the 21H2 (Build 19044.xxx - xxxx.xx) option to download the Windows 10 November 2022 Update.
 Source: Windows Cardinal
 - Click the Keep push.
- Utilise the "Edition" driblet-down menu and select the Windows 10 Domicile/Pro pick.
- Click the Go on button.
-
Use the "Language" driblet-down menu and select the installation linguistic communication.
Quick tip: In the United States, cull the "English" pick, not "English language International."
- Click the Continue push.
- Use the "Architecture" drib-down menu and select the 32-bit or 64-bit (recommended).
- Click the Download button.
- Select the location to download the ISO file.
- Click the Relieve push.
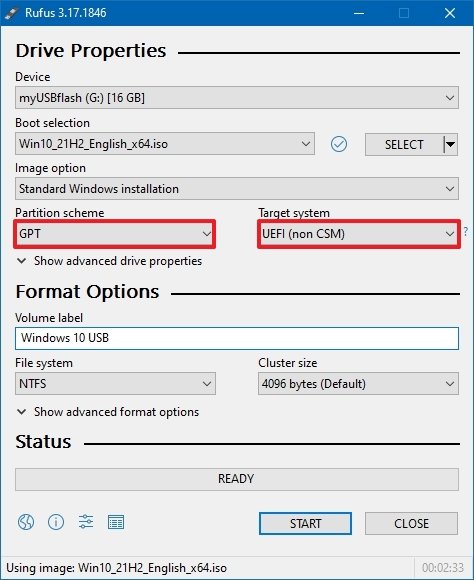
- Use the "Paradigm pick" drop-down carte du jour to select the Standard Windows installation option.
- Apply the "Sectionalisation scheme" drop-down bill of fare to select the GPT selection.
-
Use the "Target system" driblet-down carte du jour to select the UEFI (not CSM) option.
 Source: Windows Central
 Quick note: If the estimator includes a legacy BIOS, select the MBR option for sectionalization scheme and BIOS (or UEFI-CSM) option target system.
- Under the "Show Avant-garde bulldoze properties" department, don't change the default settings.
- (Optional) Under the "Volume characterization" field, enter a descriptive proper name for the drive — for example, "win10_usb."
- Nether the "File system" and "Cluster size" sections, don't change the default settings.
- Click the Show advanced format options button.
- Select the Quick format and Create extended label and icon files options.
- Click the Get-go button.
- Click the OK button to confirm.
- Click the Close button.


After yous complete the steps, Rufus volition download the ISO file from the Microsoft servers, and it'll create the bootable media to perform a clean install of Windows 10.
How to perform make clean install of Windows x
The installation process of Windows ten has 2 main parts, including the setup and out-of-box feel (OOBE). In the setup procedure, that's where you will select some of the basic settings, and you'll find the options to erase the hard bulldoze, configure the partitions, and clean install Windows 10. The out-of-box experience happens after the setup is complete, and it's the stage where you'll configure your settings, such as region, network, account, privacy, and other settings.
Windows ten clean install process
Subsequently the preparation, you can keep with the clean installation of Windows 10.
Warning: This is another friendly reminder that this procedure volition erase everything on the computer. Before proceeding, it's always recommended to make a temporary full fill-in of your PC.
To do a make clean installation of Windows ten, employ these steps:
- Beginning the PC with Windows ten USB media.
- On prompt, printing whatever key to boot from the USB flash bulldoze.
-
On the "Windows Setup," click the Next button.
 Source: Windows Central
 Quick tip: If your language, time and currency, and keyboard are different from the default selections, brand sure to select the correct settings.
-
Click the Install at present button.
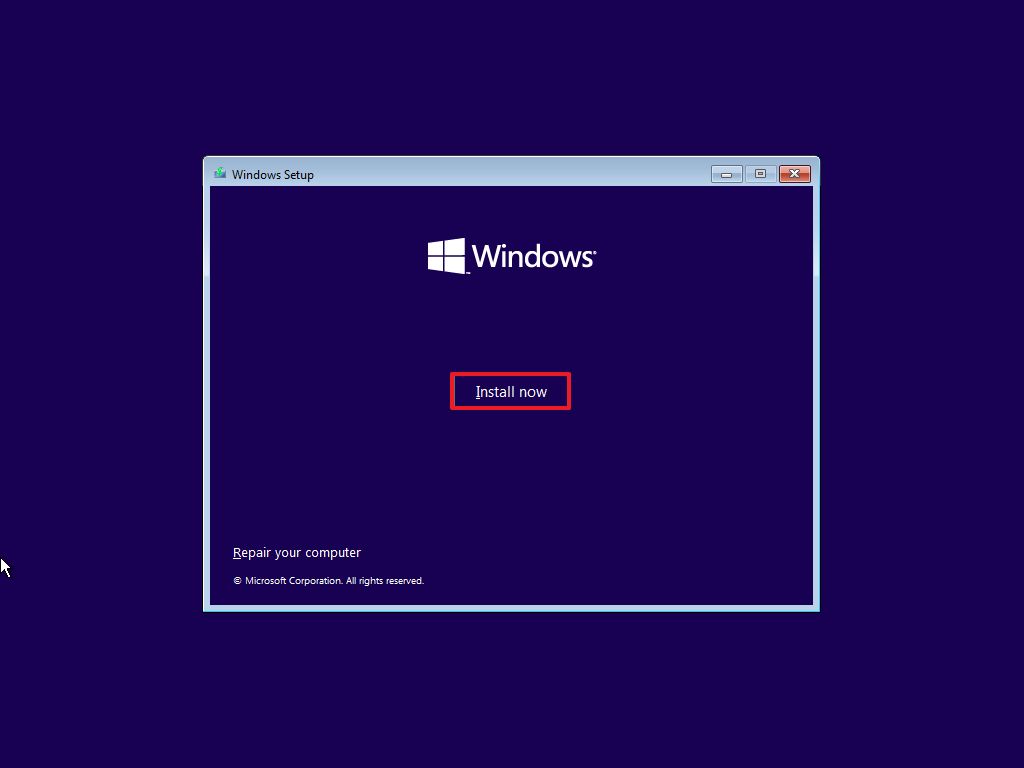 Source: Windows Fundamental
 -
On a reinstallation, click the I don't have a product key option to go on (assuming that your device was already activated). Otherwise, if this is your first time installing Windows ten, enter the production key.
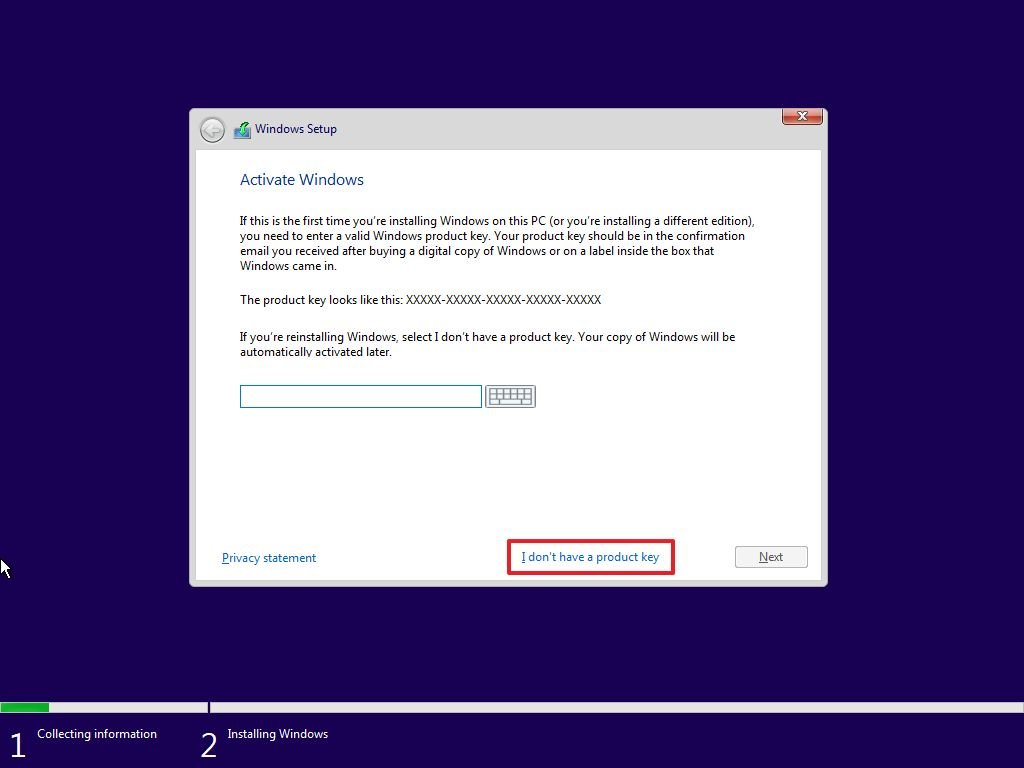 Source: Windows Central
 - Click the Next button.
-
Select the edition of Windows x (If applicable).
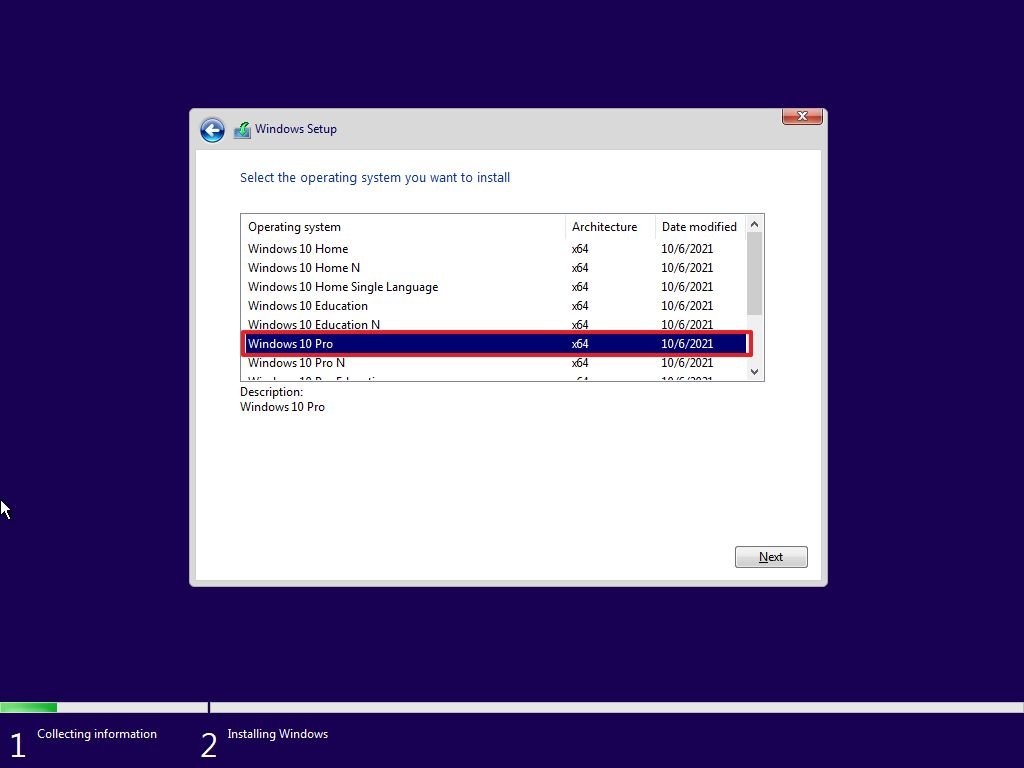 Source: Windows Primal
 Quick note: The pick has to match the edition of your production key. If yous don't select the correct edition, Windows 10 won't activate, and yous'll take to redo the unabridged process.
- Click the Side by side button.
- Select the I accept the license terms pick to continue.
- Click the Next button.
-
Click the Custom: Install Windows only (Advanced) option to continue with a make clean installation.
 Source: Windows Cardinal
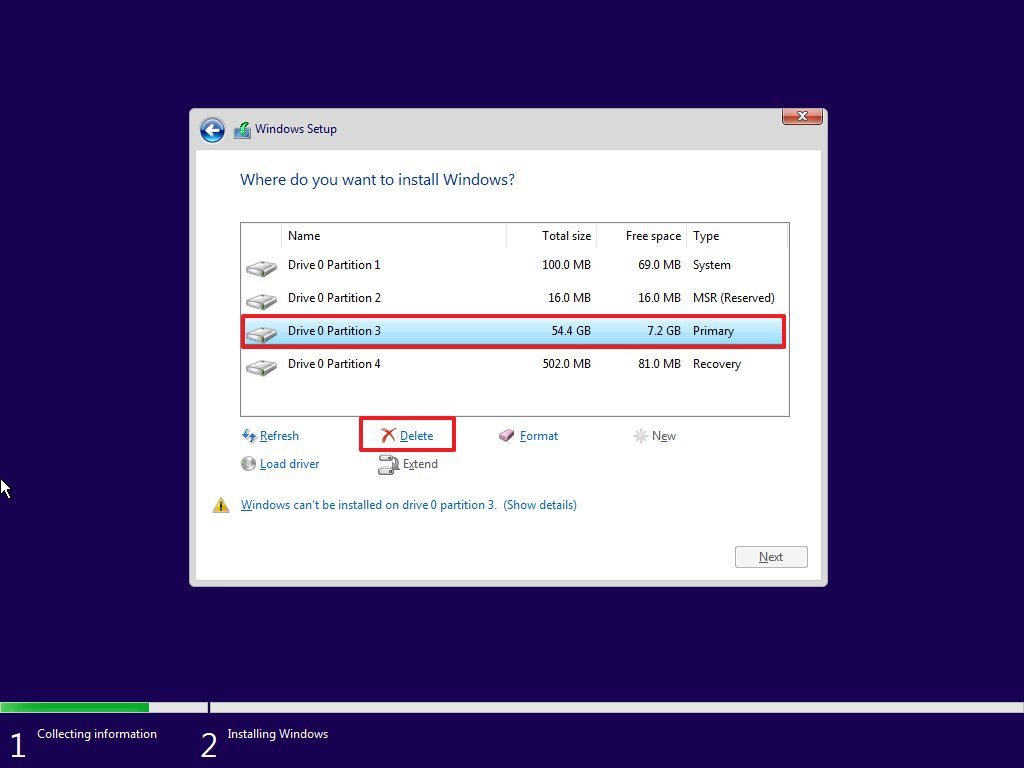
 -
Select the partition with the electric current installation (unremarkably "Bulldoze 0") and click the Delete button.
Quick tip: If "Drive 0" has multiple partitions, y'all have to select and delete each partition to allow the setup to apply the entire hard drive for the new clean installation. The setup will create the required partitions automatically during the procedure. Also, it's non necessary to delete the partitions on secondary drives.
-
Click the Yes button.
 Source: Windows Fundamental
 -
Select the empty bulldoze (Drive 0 Unallocated Space).
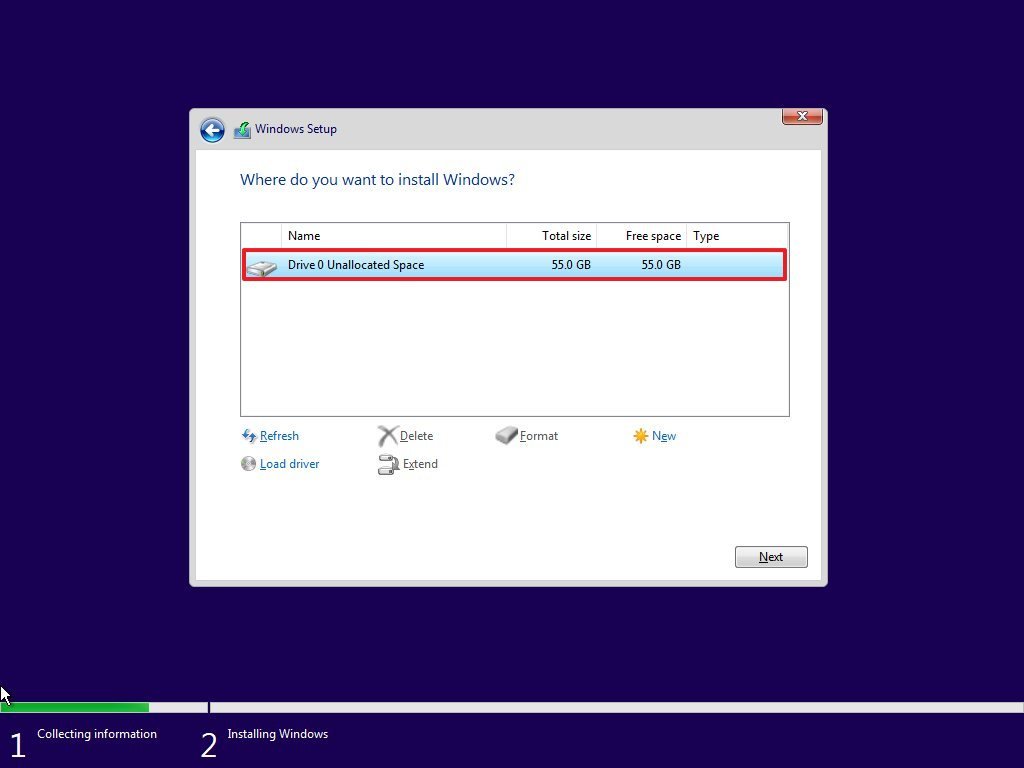 Source: Windows Central
 - Click the Next button.


In one case you lot consummate the steps, the setup will install a fresh copy of Windows ten on the device.
If you plan to decommission the estimator, you exercise not need to continue with the out-of-box experience. If this is an upgrade, proceed with the instructions below.
Windows x out-of-box feel
Later on the setup, you lot take to continue with the out-of-box experience to configure your preferences and create a new business relationship.
To complete the OOBE on Windows 10, use these steps:
-
Select your Region option.
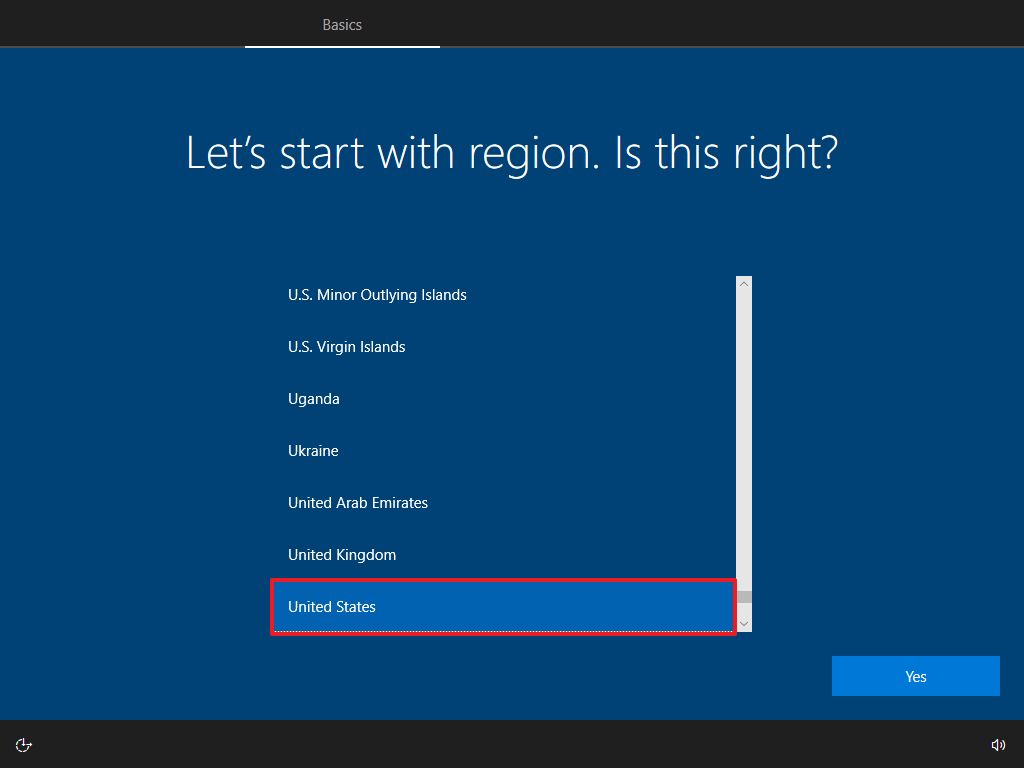 Source: Windows Central
 - Click the Yep button.
-
Select your keyboard layout option.
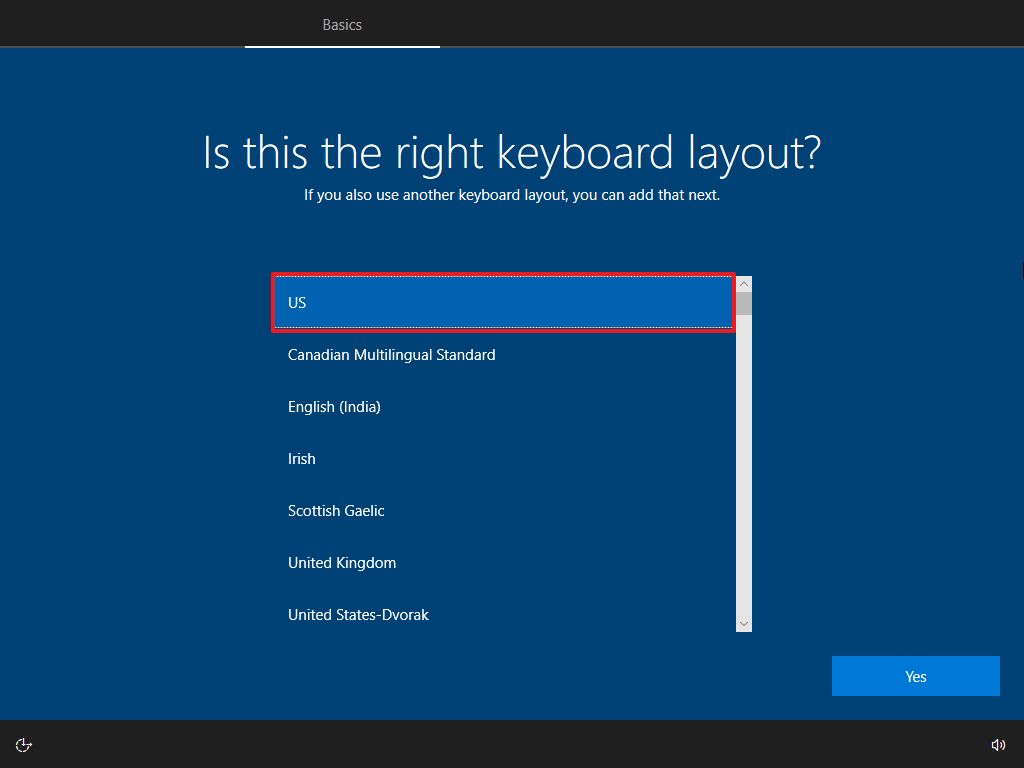 Source: Windows Central
 - Click the Yes button.
-
Click the Skip button (unless you need to add a 2d keyboard layout).
Quick notation: If you don't accept a wired network connection, you'll have to sign into the wireless network.
-
Select the Set for personal use option.
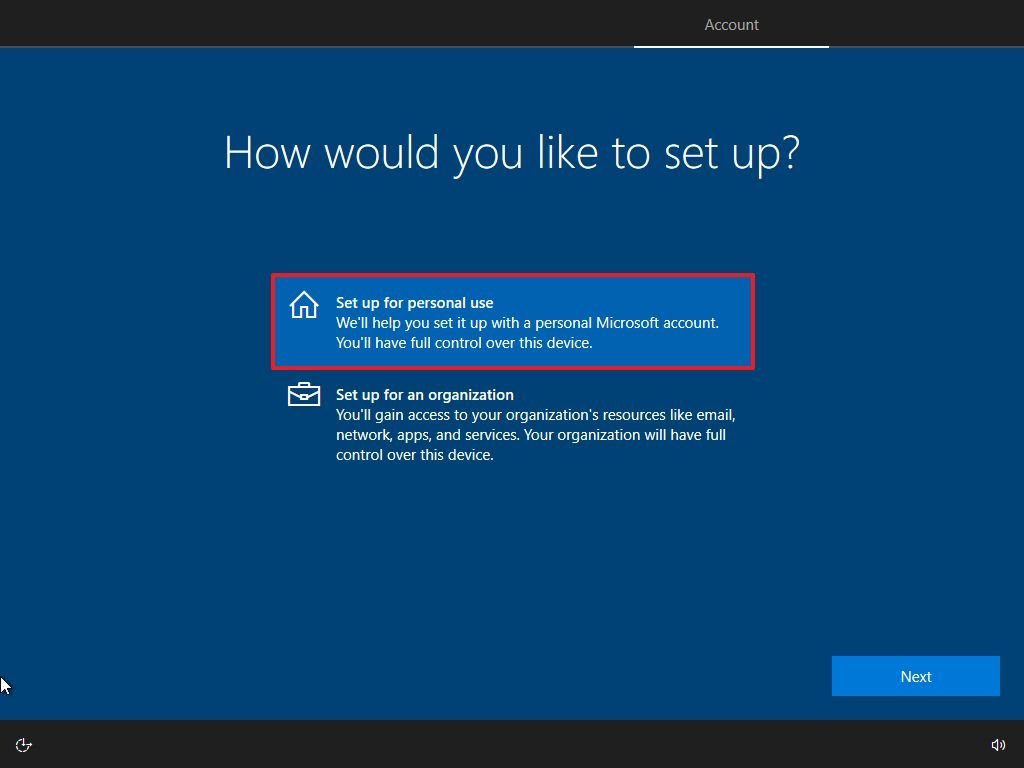 Source: Windows Primal
 - Click the Adjacent button.
-
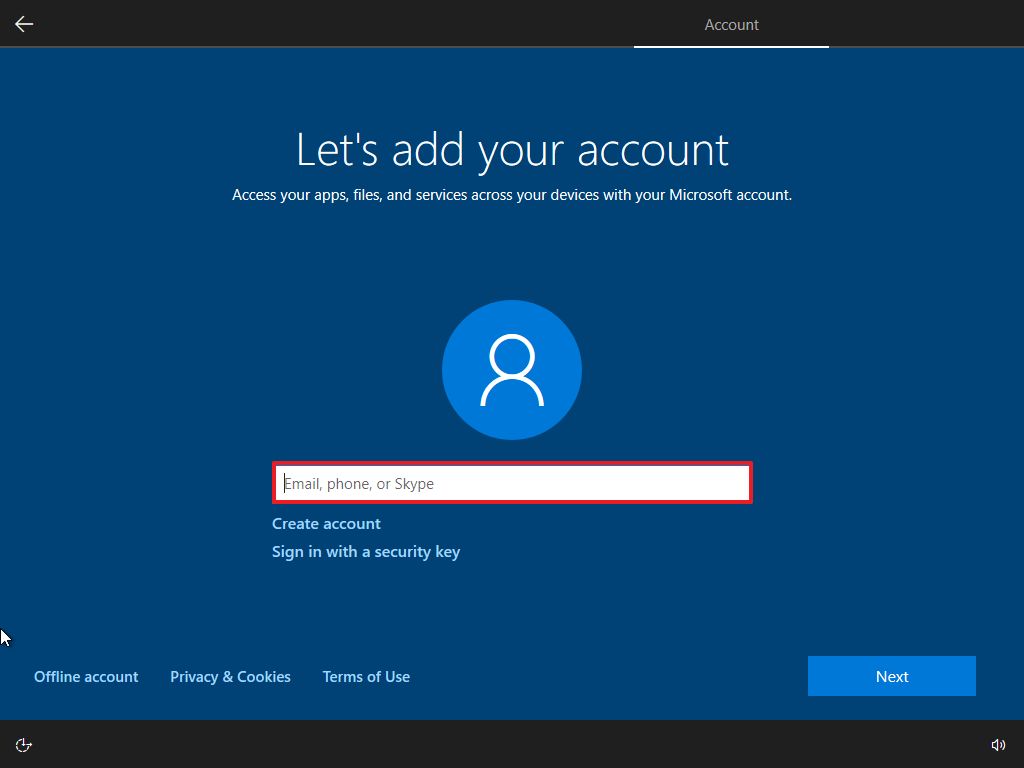
Confirm your Microsoft account information to create an account.
 Source: Windows Central
 Quick note: The recommended procedure is to employ a Microsoft account. However, if yous want to apply a traditional local account, you'll demand to click the Offline account pick from the bottom-left corner and continue with the on-screen directions.
- Click the Next push.
- Ostend your account password.
- Click the Next button.
-
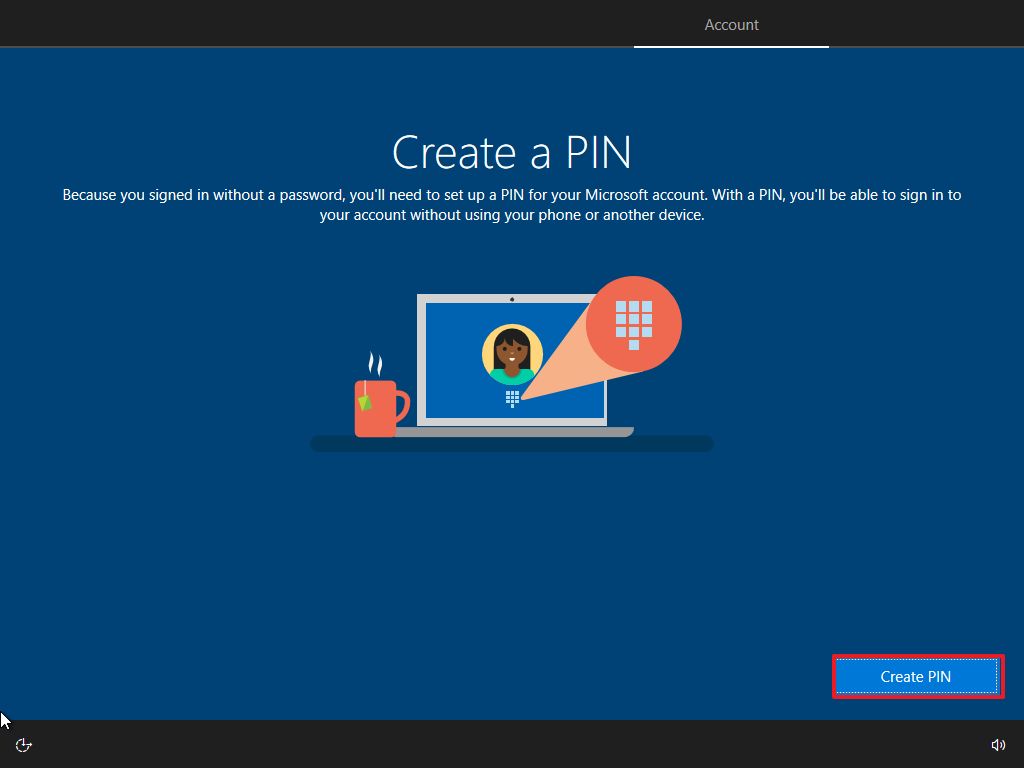
Click the Create PIN button.
 Source: Windows Fundamental
 -
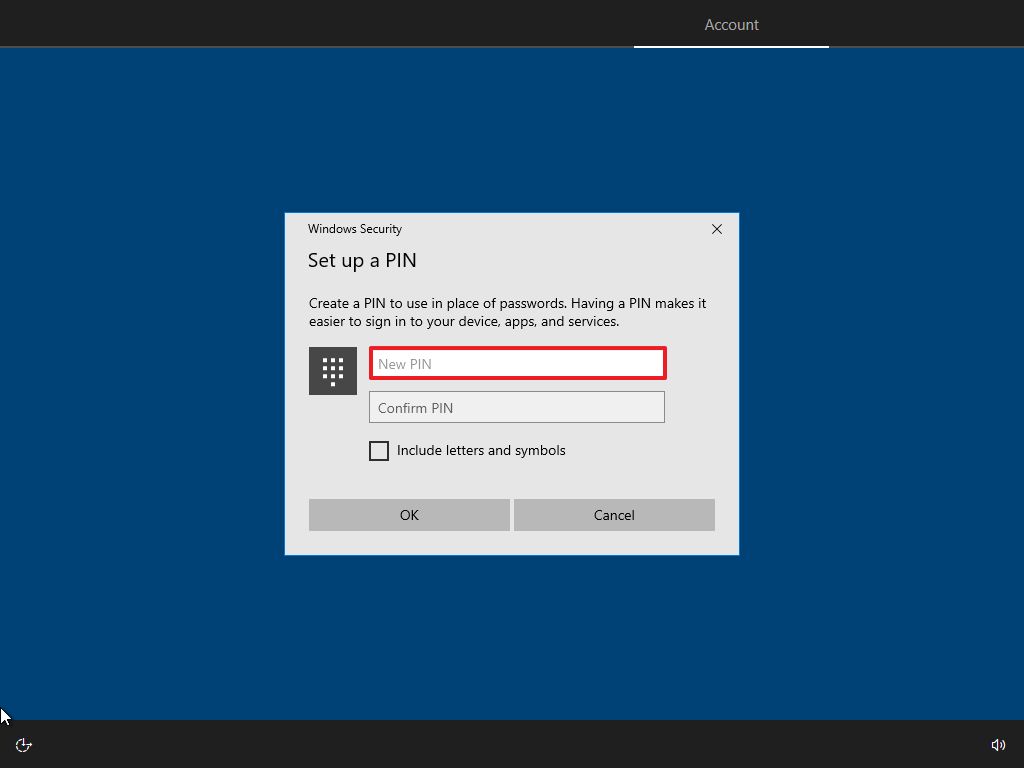
Create a four-digit Windows Howdy PIN.
 Source: Windows Key
 Quick tip: If you want to continue using a traditional password, click the Cancel button to skip the process.
- Select the privacy settings for the device (and don't forget to scroll down the page to review all the available settings).
-
Click the Take button.
 Source: Windows Central
 -
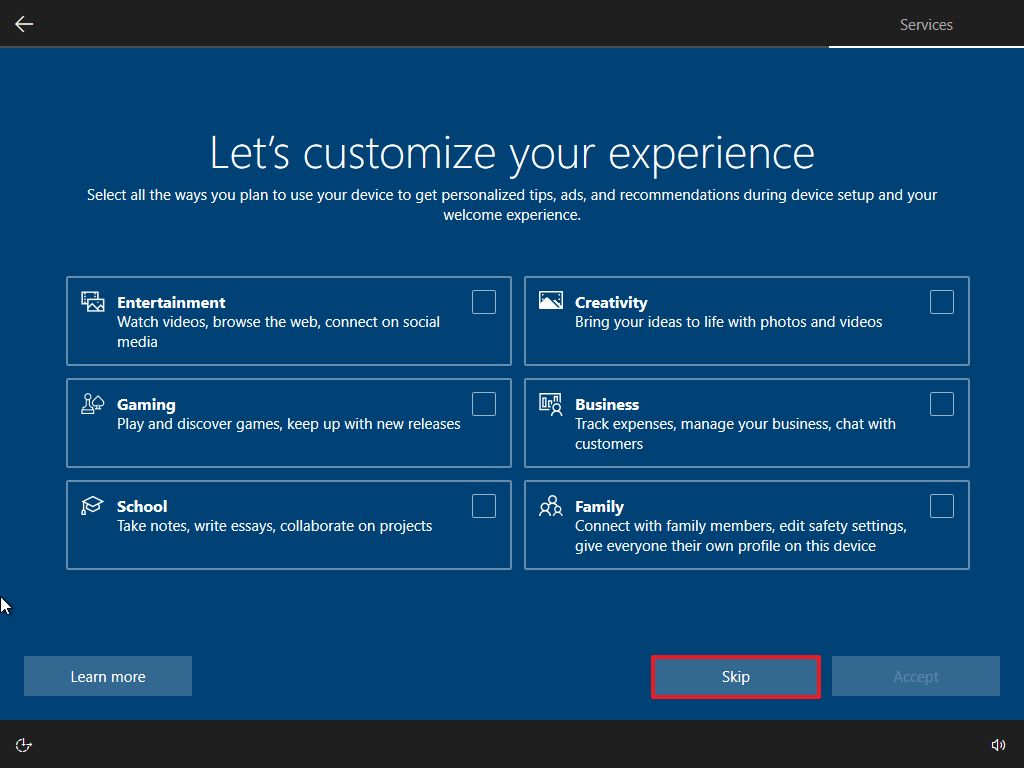
(Optional) Click the Skip button, or select how you will be using the device to receive targeted ads, tips, and other recommendations and click the Accept push.
 Source: Windows Central
 -
(Optional) Click the No, thank you button to skip the phone link procedure.
 Source: Windows Cardinal
 -
(Optional) Click the Next push to allow OneDrive to support the Desktop, Documents, and Pictures folders to the cloud. If yous use another cloud service or prefer not to upload files to the cloud, click the Only salve files to this PC option in the screen'due south bottom-left corner.
 Source: Windows Key
 -
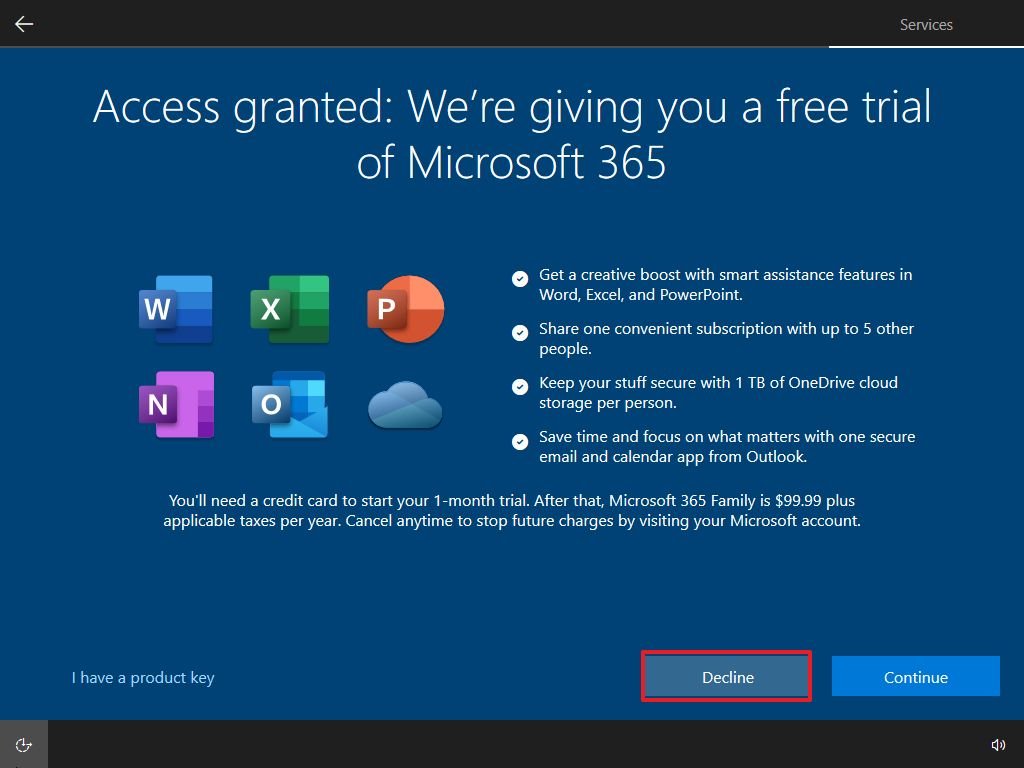
Click the Decline button to skip the Microsoft 365 setup (equally necessary).
 Source: Windows Cardinal
 Quick tip: If you have an Office production key, you lot can click the I have a production key option, so the apps will install automatically.
-
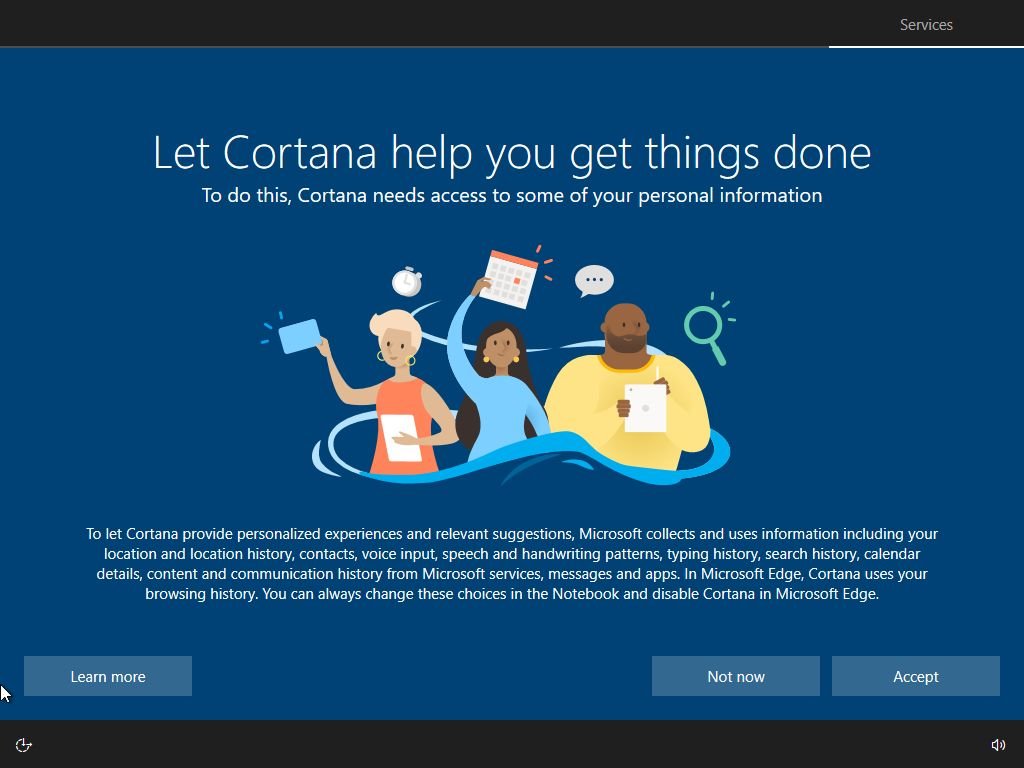
(Optional) Click the Not now button to continue without setting up Cortana.
 Source: Windows Central


Afterward you complete the steps, the settings will apply to the clean installation of Windows 10, and y'all should exist able to see the default desktop feel.
How to complete setup afterwards installation of Windows 10
Once the installation is complete, it'due south also good to bank check that Windows ten isn't missing any disquisitional updates or drivers and is properly activated.
Install updates
To download and install the latest updates, apply these steps:
- Open up Settings.
- Click on Update & Security.
- Click on Windows Update.
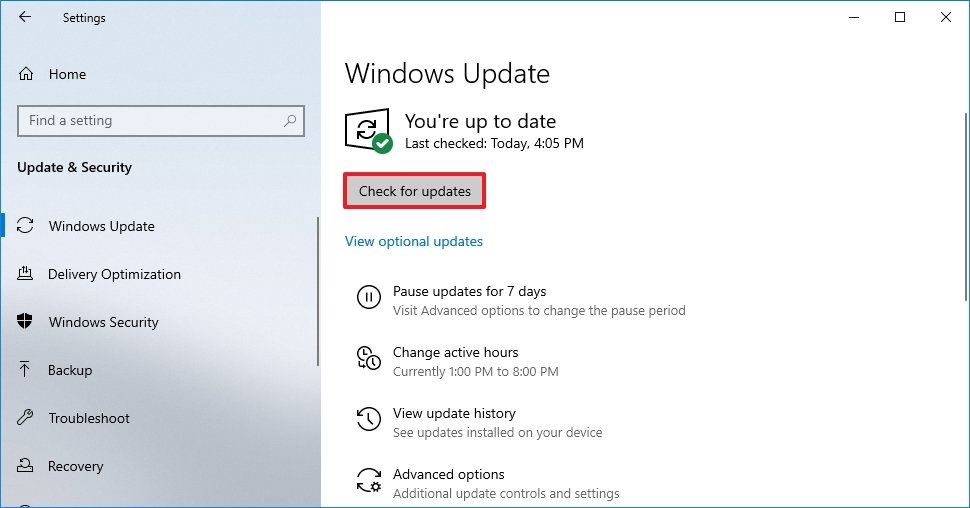
-
Click the Check for updates button.
 Source: Windows Central

Once you consummate the steps, any bachelor updates will automatically download and install. Also, a restart may be required to complete the update process.
Check missing drivers
To determine whether drivers are missing on Windows 10, use these steps:
- Open Start.
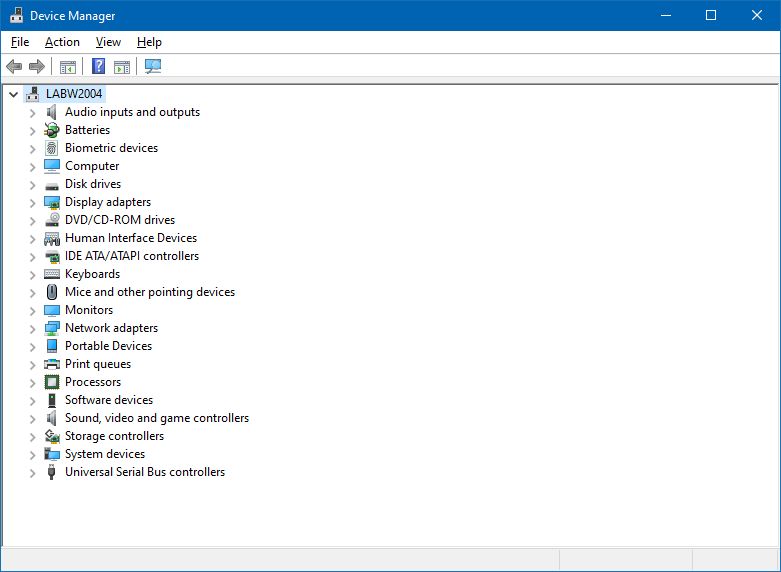
- Search for Device Manager and click the top issue to open the app.
-
Confirm that none of the devices has a yellow or red mark, and make sure nothing is listed as unknown.
 Source: Windows Primal

If some hardware has problems, you may need to manually install the latest drivers from your figurer manufacturer's back up website. You tin can utilize this guide to install device drivers on Windows ten.
Install missing drivers
On Windows 10, drivers can besides be part of the optional updates. If the reckoner doesn't have all the required drivers, you may be able to download them from Windows Update.
To download missing drivers on Windows 10, use these steps:
- Open Settings.
- Click on Update & Security.
- Click on Windows Update.
-
Click the View optional updates choice. If the option isn't bachelor, it means that Windows Update doesn't have any driver updates for the computer.
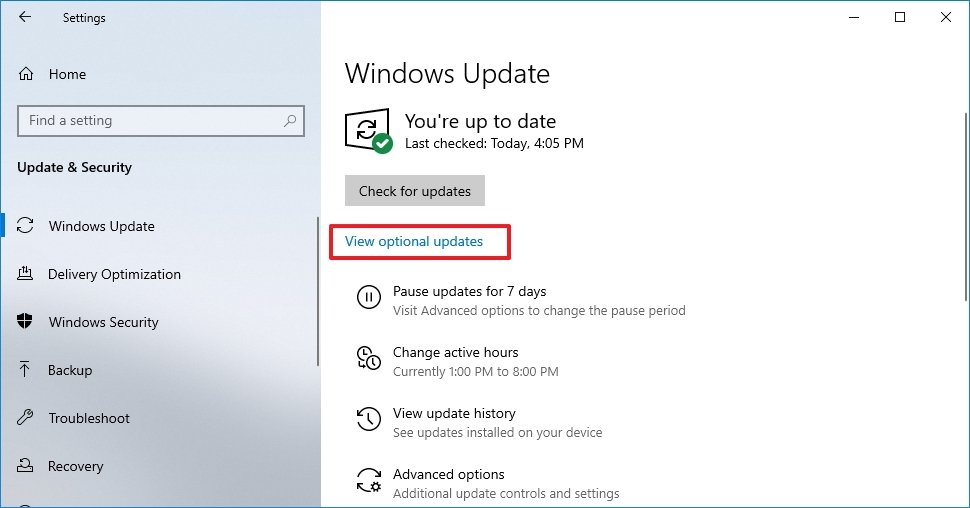 Source: Windows Central
 - Click the Commuter updates department.
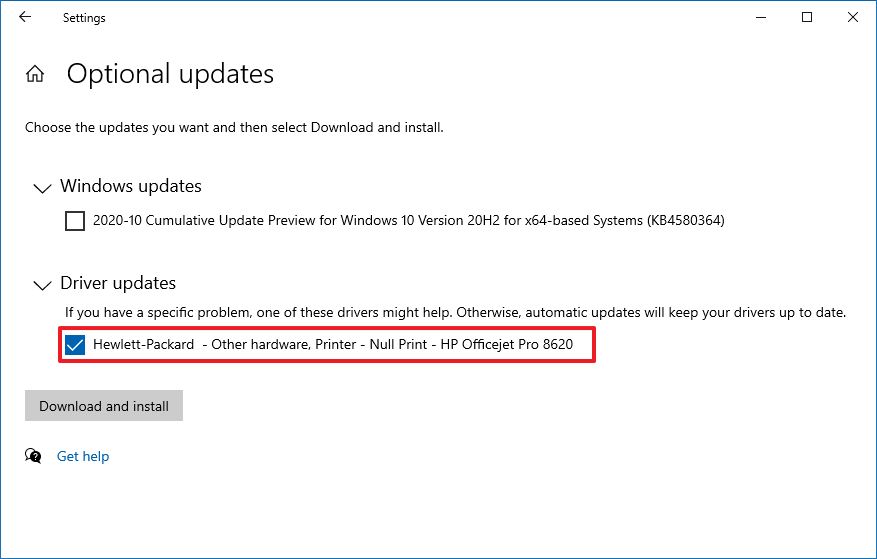
-
Select the missing driver.
 Source: Windows Central
 - Click the Download and install button.


Later on you complete the steps, Windows Update will download and install the missing drivers automatically.
Confirm activation
To ostend Windows 10 was activated correctly, apply these steps:
- Open Settings.
- Click on Update & Security.
- Click on Activation.
-
If Windows 10 is activated successfully, you will see ane of these letters:
- Windows is activated with a digital license: The installation has been activated, merely information technology isn't linked to your Microsoft account.
- Windows is activated with a digital license linked to your Microsoft business relationship: The installation has been activated, and the license is linked to your Microsoft account.
Source: Windows Central
In case Windows 10 didn't activate, the device will try to reactivate at a later time. If you're notwithstanding having issues afterwards a couple of days, you can employ the Activation Troubleshooter to actuate.
Reinstall apps
It's now fourth dimension to reinstall the apps, including your preferred web browser, such equally Google Chrome, Mozilla Firefox, or Opera to browse the web.
If you utilise Spotify or iTunes to heed to tunes while working or surfing the internet, you can download these apps and others from the Microsoft Store.
Also, it's now a good time to download and install the Microsoft Part apps to kickoff working with Discussion, Excel, and PowerPoint, and managing your emails with Outlook.
Restore files from backup
The terminal matter left to exercise is to restore your documents from fill-in. If you previously configured file fill-in with OneDrive, the data should already be available within the OneDrive folder, but if the app didn't configure automatically, you can use this guide.
If y'all have a backup of your files on an external drive, reconnect the storage to restore the data into the default folders (Documents, Downloads, Pictures, etc.).
To restore files from fill-in on Windows ten, use these steps:
- Open up File Explorer.
- Nether the This PC department in the left pane, select the external drive with the file backup.
- Select the folders with the file to restore.
-
Click the Re-create to menu from the "Dwelling" tab.
 Source: Windows Key
 - Select the Choose location option.
- Select the destination to restore the files — for example, the Documents folder.
- Click the Copy button.

After you complete the steps, the files will restore to the new location.
Although you can commencement a clean installation using the Media Creation Tool without a USB media and even the "Reset this PC" option from the recovery settings, these methods have their limitations and practise non always work as expected. The bootable media is the alternative if yous desire the best possible make clean installation method.
More Windows resources
For more helpful articles, coverage, and answers to common questions almost Windows 10 and Windows xi, visit the following resources:
- Windows 11 on Windows Primal — All you need to know
- Windows 11 assistance, tips, and tricks
- Windows ten on Windows Cardinal — All y'all need to know
Nosotros may earn a commission for purchases using our links. Learn more.

Room to grow
Here'southward how Forza Horizon five could be fifty-fifty amend
Forza Horizon v is one of the best games of 2022, and i of the greatest racing games you can play. It's certainly not perfect, though, with enough of areas with room for improvement. Here are v things Forza Horizon v could do better.

Source: https://www.windowscentral.com/how-do-clean-installation-windows-10
Posted by: downinghousle.blogspot.com
0 Response to "How To Format And Install Windows"
Post a Comment